2012年02月28日
Dynamic Warriors
私たちのブログを訪問していただきありがとうございます。あなたがお持ちの場合DIYの要求は私達に電子メールを送信してください。
Run the gun and your mind through Magpul’s high-speed, low-drag carbine course with today’s top tactical operators!
Little of the Magpul Dynamics course is standing on the flat range firing numbered shot counts. Students are taught to move, turn, problem solve and deliver accurate shots.
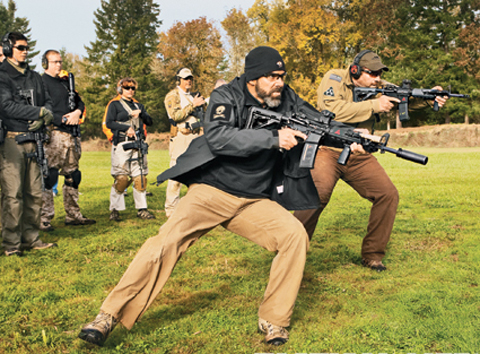
To check out the company that has sold more than 1.5 million polymer magazines and whose training division raised the bar on instructional videos with its Art of the Dynamic Carbine (1&2), Art of Dynamic Handgun and Aerial Platform Operations Series, TW stepped inside the Magpul Dynamics’ Dynamic Carbine Course in Hammond, LA to see if these guys are as good as their videos.
Dynamic Carbine 1: Building the Fundamentals
"We will give the students an honest snapshot of themselves, very quickly,” says Chris Costa, Magpul Dynamics Instructor. The Dynamic Carbine 1 course brought together shooters from across the country and throughout the range of shooting experience. There were several husband and wife attendees, a father and son, as well as law enforcement, hobbyists, and professional security contractors. After a detailed safety briefing, instructors Costa, Haley, and Olivella began building up the fundamentals in their students. Starting with basic body position, stance, and trigger control, the class moved to confirming zero on their optics. Once zeroed, in-depth work began on sight picture/sight alignment differences at ranges from 5 to 50 yards. Reload techniques such as speed (under fire), tactical (in action, but covered), and admin (no threat, get re-organized) were covered, as well as malfunction drills (double-feed, mag failure, mis-fire, stovepipe).

Instructor demonstrates the supine position. The position is a critical skill that allows shooter to tactically recover from a slip or dramatically reduce his profile while continuing to deliver well-aimed shots under fire.
As the course continued over the next three days, BSA drills (“Balance of Speed and Accuracy”) became a common element. The BSA drill measures timed rounds into an 8-inch center-mass circle on the man-sized Magpul targets. Students were encouraged to push their limits from standing, kneeling, and prone positions at varying distances. The targets told the tale: If the group was too tight with no hits outside the circle, speed was lacking. If the group was scattered outside the circle, the shooter should slow down and concentrate on body position and accuracy. This litmus test gave each student instant feedback at every drill as to how fast he/she could push the rifle and put combat-effective hits on the target.

Magpul tests both decision making and weapons handling skills. Above, a student engages multiple targets from the open window of a vehicle.
On the afternoon of day two, the instructors conducted a “mini” handgun course. While the handgun is typically a class unto itself, the transition to the handgun in the event of a carbine malfunction at close range is a crucial skill and would become a part of many of our subsequent drills. Day three brought a significant increase in the pace of the drills, which now included weapons transitions, timed speed events, movement to multiple targets and barricade obstacle shooting. Dynamic Carbine 1 ended with shooters more confident, competent, and mindful than when they arrived.
from tactical-life
BLOG ARCHIVES

2012年02月28日
Smith & Wesson Bodyguards
私たちのブログを訪問していただきありがとうございます。あなたがお持ちの場合DIYの要求は私達に電子メールを送信してください。
Laser-equipped deep-cover .38 snubbie and .380 auto — ideal for back-up carry!

WHEN IT COMES TO HAVING A CORNER ON THE DEEP-COVER carry market, nobody beats out Smith & Wesson. Beginning with the “Chief’s Special,” an ultra-compact snubnose packing five rounds of .38 Special into the tiny J-frame package, the company created the basis for what would become the iconic deep-concealment revolver and back-up gun for law enforcement officers around the country.
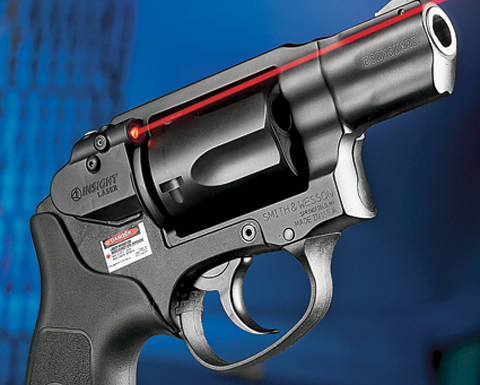
An integrated Insight red laser sight assembly is located to the right rear of the cylinder on the Bodyguard 38.
With lightweight variants, differently chambered versions, and ones with longer barrels or different grips or different sights, it seemed that just about every variation of the design was developed for every conceivable contingency. However, at its core, the classic J-frame was a design from a different era, being first offered in the 1950s, and one that was both time-consuming and relatively expensive to manufacture.
Although sales were (and still are) extremely strong on the traditional J-frames, Smith & Wesson recognized that there was a need for the development of a radically modern deep-concealment revolver—one that took advantage of the most modern of materials and construction methods and that hit a lower retail price point.

The Insight laser module of the 380 is internally located within the dustcover portion of the polymer frame. Note the light gray round activation button.
Concurrent with this realization was an acknowledgement on Smith & Wesson’s part of the extreme demand in the market for deep-concealment semi-autos chambered in .380 ACP that offered good power in a very small package. In response, the company began the process of developing what we now know today as the “Bodyguards”—a .38 Special revolver and .380 ACP sub-compact autopistol.
By Michael O. Humphries, Images by Steve Woods
BLOG ARCHIVES
2012年02月28日
Recce with M16 Buttstock
私たちのブログを訪問していただきありがとうございます。あなたがお持ちの場合DIYの要求は私達に電子メールを送信してください。

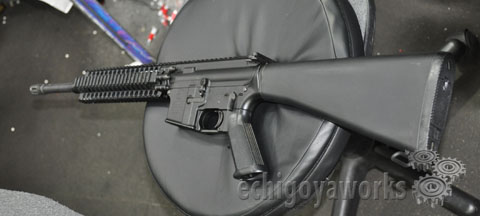
Following are photo collage on how our master tuners disassemble and replace the buttstock of a Recce to accommodate an M16 buttstock.
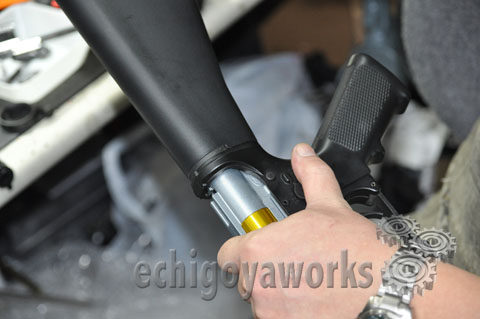
Fitting the Buttstock
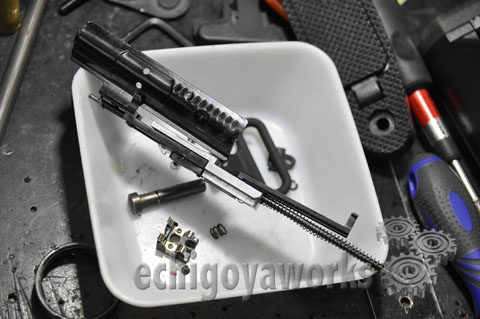


Organizing the original parts.

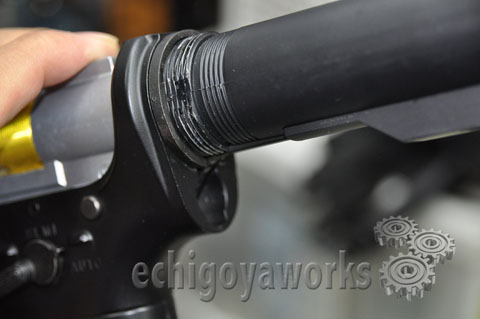
Modding the stock and the buffer tube.

Installing an extender for the buttstock attachment


BLOG ARCHIVES


Following are photo collage on how our master tuners disassemble and replace the buttstock of a Recce to accommodate an M16 buttstock.

Fitting the Buttstock


Organizing the original parts.


Modding the stock and the buffer tube.

Installing an extender for the buttstock attachment


BLOG ARCHIVES
Posted by echigoyaworks
at 12:00
2012年02月28日
Eotech’s EXPS3-2 Sight
私たちのブログを訪問していただきありがとうございます。あなたがお持ちの場合DIYの要求は私達に電子メールを送信してください。
Evolution of the Holographic Weapon Sight — getting on target faster when seconds count!

When asked which sight to use on an AR15 platform, the EOTech is generally a first choice. It just works so well on the platform, and is truly well suited for police work. There is certainly nothing wrong with a simple red dot system, but the larger reticle with various aiming points simply lends itself to what police officers do. It allows for many reference points at varying distances to compensate for sight offset, without the need to necessarily look for a dot. As a rather staunch adherent to the concept of focusing on the threat and not the sight, this system works really well. When precision is paramount, the center dot can be used. At CQB distances, you need simply put the threat in the correct portion of the reticle and go to work. It has always proven to be very fast, accurate and precise when needed.

The EXPS3-2 takes up little space on the rails, easily accommodating additional accessories such as NVDs or the G23.FTS magnifier.
The mounting system right out of the box co-witnesses most BUIS systems designed for the AR Platform, thus removing the need to buy another mount. It zeroes easily with no special tools and, depending on the model, accommodates night vision equipment as well. In the case of the XPS, mounting that 123 battery transversely really cuts down on the size. For years my preference was the N-battery model for just that reason; it just makes it so compact.
The EXPS3 system is available in two configurations, the only real difference being the reticle. The EXPS3-0 uses the standard 65 MOA reticle with a single 1 MOA aiming dot. The EXPS3-2 uses a 65 MOA reticle but contains two, 1 MOA aiming dots (the sight provided has these two aiming dots). There are some other changes to this system as well. The battery cap and latch are gone, replaced by a simple O-ring and cap tethered to the sight. It also utilizes a quick release system that is shorter, more compact, and goes on and off very easily. Lastly, buttons are mounted to the side in order to accommodate the use of night vision or the three-power magnifier.
The first thing observed was the clarity of the reticle. Not sure if they changed anything, but this one just seemed to be more “solid” to me. There was a bit less of the pixelation that is sometimes seen. It was mounted to my Para USA TTR for the bulk of the live fire testing; but was fitted to several other uppers.
The mount is really easy to get on and off. A simple push of the button in the front of the mount and it comes loose. It fit with no adjustment on all of my upper receivers and the Para USA TTR.
By Dave Bahde
BLOG ARCHIVES

