2012年03月16日
Barrett M240LW Prototype
私たちのブログを訪問していただきありがとうございます。あなたがお持ちの場合DIYの要求は私達に電子メールを送信してください。

Barrett brought their lightweight M240LW prototype to the Big Bang Shoot and SHOT Show. Unlike the M240L, which is in service with the Army, it does not use any exotic/expensive materials or manufacturing techniques to decrease weight. They instead decreased weight by trimming off as much metal as possible and decreased manufacturing costs by making the receiver in two pieces and then bolting it together. They managed to trim about 6 pounds off the standard M240B.


BLOG ARCHIVES

2012年03月16日
Blackwater pistol: SIG SAUER P226 Blackwater Special Edition
私たちのブログを訪問していただきありがとうございます。あなたがお持ちの場合DIYの要求は私達に電子メールを送信してください。

Blackwater sure are pushing their brand. I am sure they will have Blackwater action-figures ready for Christmas.
The SIG SAUER® P226 Blackwater Special Edition was designed in cooperation with some of the world’s best known experts in tactical operations – Blackwater Training Center. When personal protection of world leaders in high-risk environments is your job then you only want the best equipment. You want a SIG SAUER® pistol because it’s engineered to perform and built to protect.
The Blackwater Special Edition P226 is a full-sized 9mm featuring a stainless steel slide with rugged, wear-resistant Nitron® finish, front cocking serrations and SIGLITE® contrasting red front and green rear night sights. The frame is black hard anodized light weight alloy with integral Picatinny rail and is accented with the famous Blackwater logoon the top of the slide and Blackwater Custom Wood grips.


The pistol comes with an extra set of durable SIG SAUER® factory grips and five (5) 15 round magazines so it’s ready to see action. The SIG SAUER® P226 Blackwater Special Edition pistol is backed by SIG SAUER® with a Limited Lifetime Warranty.
Article and photos from the firearmblog
NEWS ARCHIVES
2012年03月16日
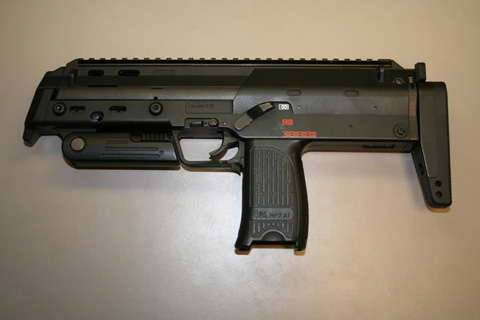
MP7 Takedown
私たちのブログを訪問していただきありがとうございます。あなたがお持ちの場合DIYの要求は私達に電子メールを送信してください。
We're going to disassemble like this...

...from this. Note that it's not necessary to remove the flash hider and side rails for this, mine were simply removed already. You'll need to remove the sights if they're in the way of the top rail screws.
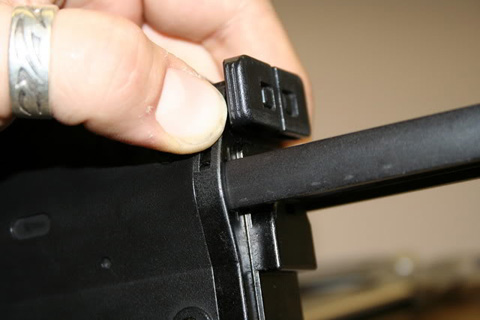
Start by removing the stock. Pull both catches up and slide the stock out and free. Take the front set off too
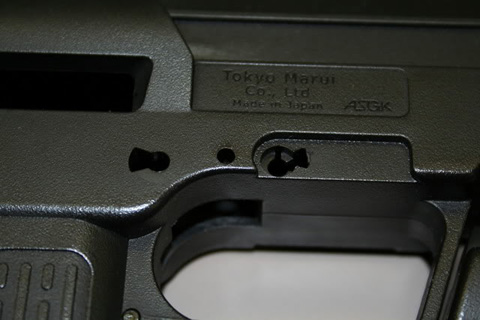
Next take the top rail off. The screw above the selector is a dummy, don't remove it. The longest screw goes in front; keep this in mind when you reinstall the rail later.

Pop the charging handle return spring off using a small tool and set it aside...

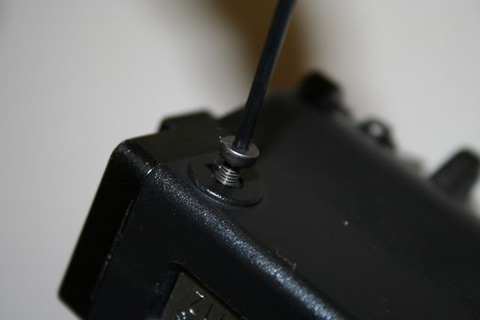
Remove the charging handle retaining screw next. You may also remove the charging handle at this time

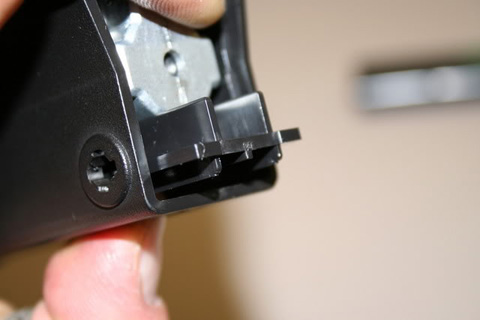
Now remove the body pin screws
And then push out the body pins
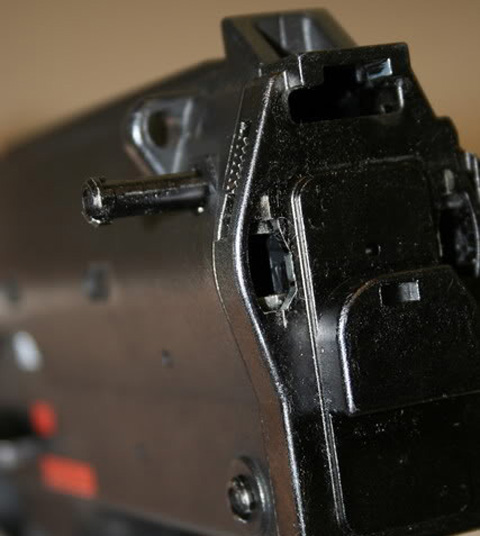
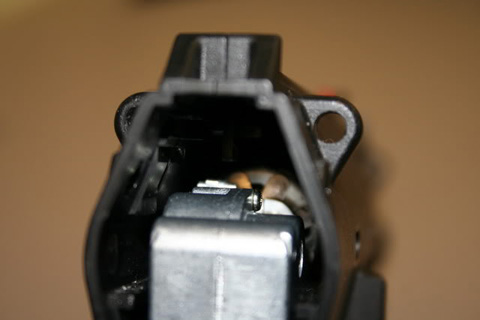
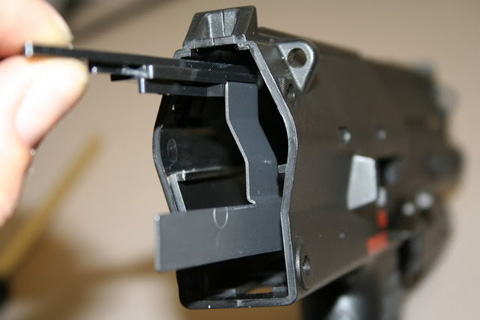
The end cap will be free now. Remove it and set it aside

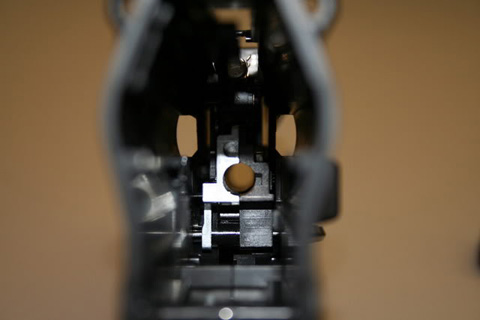
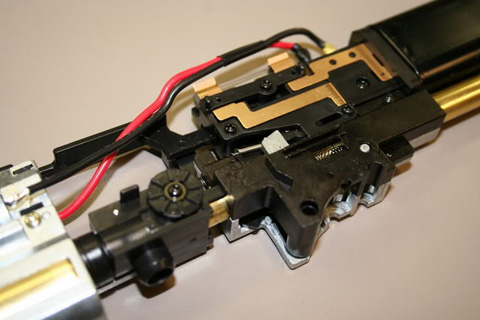
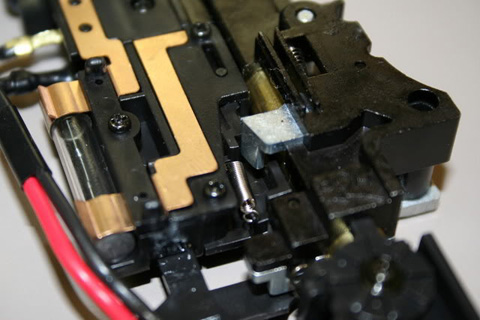
Here's the inside view at this point. You can see the back of the gearbox

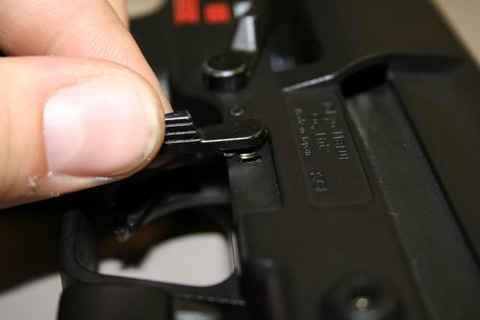
The next step is to remove the serial number plate. It just slides out
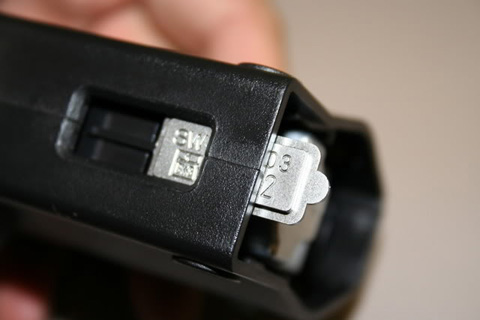
You may then remove the gearbox retainer shim. The gearbox will slip down a bit after this is removed
Look above the gearbox and note the semi-auto cutoff lever actuator arm and its connection to the semi-auto cutoff lever. You'll need to get this back correctly when reassembling the gun or you will not be able to switch to auto
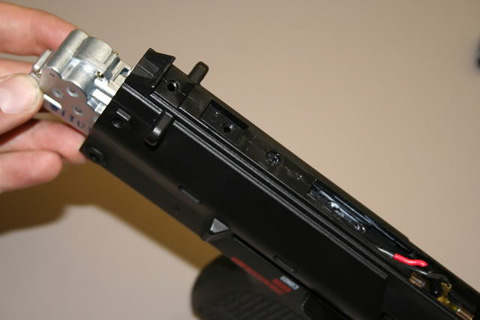
Now pull the gearbox out of the back. You'll need to disconnect the wires first of course; they need to be fed through the slot in the top as you remove the gearbox
When putting the gearbox back in you'll need to use a small tool to pull the wires back up

Here's the gearbox. It really is very small

The inner barrel assembly can now be removed. It'll just slide out

Here's the hop up unit as viewed from the left side

and the bottom

and the right

and the top

and the back

Now is a good time to remove the 'bolt'. Slide it back as far as you can

Press down on the part towards the top

Here's another view. Pressing this down will allow it to come free of the track inside

It can then be pulled out the back
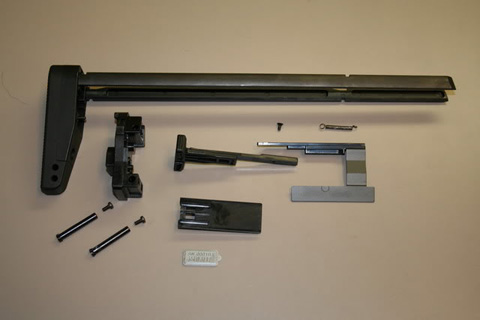
Here are all the rear set components
Now it's time to take out the selector lever, trigger, and bolt release so the switch assembly can be removed. Start by pushing out the bolt catch spring pin. Don't lose it! Pull the lever off and set is aside as well

Now pull out the lever very carefully, pay attention to the spring's position
You can see the hooked part catches the post in the lever and the straight part fits into a notch in the hole

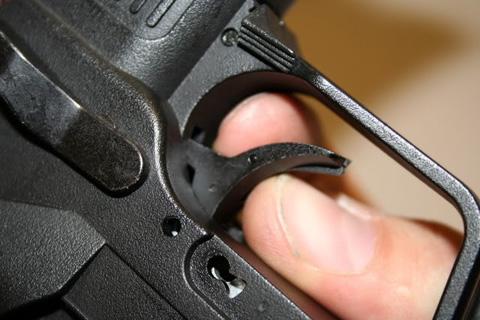
Now push out the trigger pin. Don't force it; it's designed to go one way. If it feels tough try pushing from the other side. You can see in this pic the side that should come out first has grooves in it

With the pin removed the trigger is free. I was worried that the trigger would be a nightmare to get in and out but it's fairly easy
Just pull it forward and out. Pay attention to the spring as you do this so you have an idea how to get it back. It's basically the reverse of removing it

Next knock out the selector lever spring pin and remove the selector lever. Set it aside in a safe place along with the lever parts

Here's the left side of the body with the bolt release, trigger, and selector components removed

And here's the right side
These are all the components that were just removed

Looking in the back, the switch assembly can be seen. Carefully remove it from the gun using tools to poke at it from the front if need be. It's held in position by rails and can be tricky to get back in place. Just take your time and poke at it through available holes. You'll get it
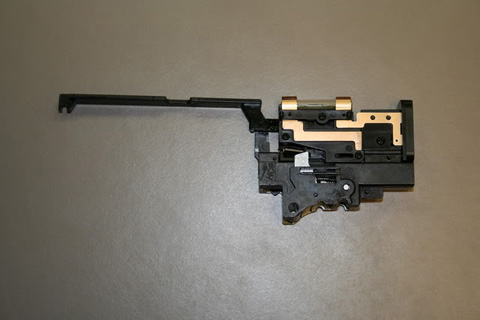
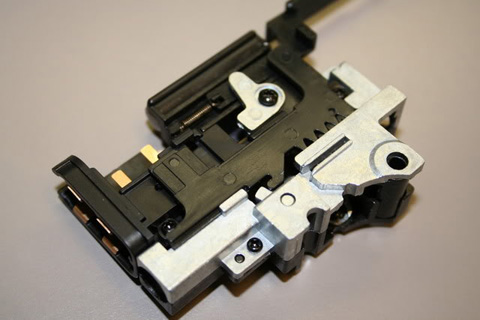
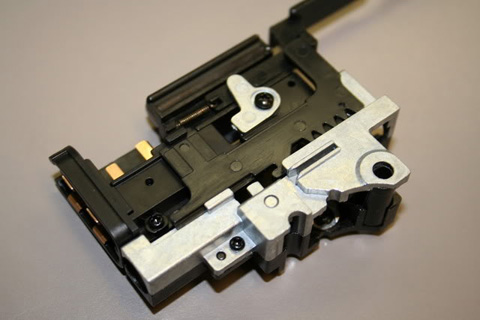
Here's the right side of the switch assembly
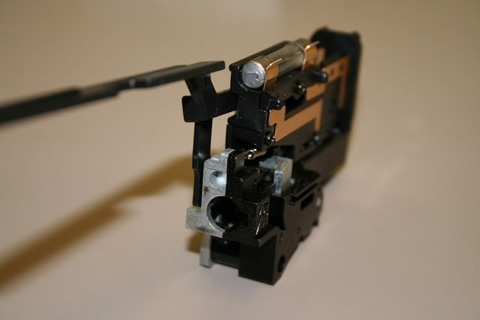
And the left

Another look. You can see the battery connector in the front

The fuse is rated at 10A if you were curious. The gearbox must not be very demanding

Here you can see where the barrel goes though the assembly
Here are all the major internal components

Here they are as they would be inside the gun when assembled as viewed from the left side

and the right

This is the connection between the semi-auto cutoff lever actuator arm and the actual semi-auto cutoff lever that was mentioned earlier

Close up on the left side of the switch assembly

And the here's the right side
This is the bottom; you can see some of the trigger mechanism

Here you can see some more of the trigger mechanism
This is what the selector mechanism looks like on safe
This is semi. It's a small difference
On auto the selector plate pushes against the cutoff lever actuator arm which disengages the cutoff lever in the gearbox

Here's a look deep inside the gutted body. There are still a few bits in there but there's no need to remove them

And now more shallow look

A view from the front

NEWS ARCHIVES
We're going to disassemble like this...

...from this. Note that it's not necessary to remove the flash hider and side rails for this, mine were simply removed already. You'll need to remove the sights if they're in the way of the top rail screws.

Start by removing the stock. Pull both catches up and slide the stock out and free. Take the front set off too

Next take the top rail off. The screw above the selector is a dummy, don't remove it. The longest screw goes in front; keep this in mind when you reinstall the rail later.

Pop the charging handle return spring off using a small tool and set it aside...

Remove the charging handle retaining screw next. You may also remove the charging handle at this time

Now remove the body pin screws

And then push out the body pins

The end cap will be free now. Remove it and set it aside

Here's the inside view at this point. You can see the back of the gearbox

The next step is to remove the serial number plate. It just slides out

You may then remove the gearbox retainer shim. The gearbox will slip down a bit after this is removed

Look above the gearbox and note the semi-auto cutoff lever actuator arm and its connection to the semi-auto cutoff lever. You'll need to get this back correctly when reassembling the gun or you will not be able to switch to auto

Now pull the gearbox out of the back. You'll need to disconnect the wires first of course; they need to be fed through the slot in the top as you remove the gearbox

When putting the gearbox back in you'll need to use a small tool to pull the wires back up

Here's the gearbox. It really is very small

The inner barrel assembly can now be removed. It'll just slide out

Here's the hop up unit as viewed from the left side

and the bottom

and the right

and the top

and the back

Now is a good time to remove the 'bolt'. Slide it back as far as you can

Press down on the part towards the top

Here's another view. Pressing this down will allow it to come free of the track inside

It can then be pulled out the back

Here are all the rear set components

Now it's time to take out the selector lever, trigger, and bolt release so the switch assembly can be removed. Start by pushing out the bolt catch spring pin. Don't lose it! Pull the lever off and set is aside as well

Now pull out the lever very carefully, pay attention to the spring's position

You can see the hooked part catches the post in the lever and the straight part fits into a notch in the hole

Now push out the trigger pin. Don't force it; it's designed to go one way. If it feels tough try pushing from the other side. You can see in this pic the side that should come out first has grooves in it

With the pin removed the trigger is free. I was worried that the trigger would be a nightmare to get in and out but it's fairly easy

Just pull it forward and out. Pay attention to the spring as you do this so you have an idea how to get it back. It's basically the reverse of removing it

Next knock out the selector lever spring pin and remove the selector lever. Set it aside in a safe place along with the lever parts

Here's the left side of the body with the bolt release, trigger, and selector components removed

And here's the right side

These are all the components that were just removed

Looking in the back, the switch assembly can be seen. Carefully remove it from the gun using tools to poke at it from the front if need be. It's held in position by rails and can be tricky to get back in place. Just take your time and poke at it through available holes. You'll get it

Here's the right side of the switch assembly

And the left

Another look. You can see the battery connector in the front

The fuse is rated at 10A if you were curious. The gearbox must not be very demanding

Here you can see where the barrel goes though the assembly

Here are all the major internal components

Here they are as they would be inside the gun when assembled as viewed from the left side

and the right

This is the connection between the semi-auto cutoff lever actuator arm and the actual semi-auto cutoff lever that was mentioned earlier

Close up on the left side of the switch assembly

And the here's the right side

This is the bottom; you can see some of the trigger mechanism

Here you can see some more of the trigger mechanism

This is what the selector mechanism looks like on safe

This is semi. It's a small difference

On auto the selector plate pushes against the cutoff lever actuator arm which disengages the cutoff lever in the gearbox

Here's a look deep inside the gutted body. There are still a few bits in there but there's no need to remove them

And now more shallow look

A view from the front

NEWS ARCHIVES
2012年03月16日
AR Buffer Upgrades
私たちのブログを訪問していただきありがとうございます。あなたがお持ちの場合DIYの要求は私達に電子メールを送信してください。
Enhanced buffers for AR patrol carbines improve performance and handling!

A well-accessorized AR is only as good as its internal parts—such as an upgraded buffer.
The ArmaLite rifle designed by Eugene Stoner was, in many ways, a “space age” gun, with Stoner having cut his teeth in the ultra-modern aviation industry. Among the design’s many advanced parts is an innocuous-looking round piece of metal that rides inside a tube in the stock of the rifle. The buffer, buffer tube, and buffer spring reside in an area most shooters don’t even bother to clean, much less think about, but its role is essential.

The Heavy Buffers unit has a nipple that prevents the bolt carrier from damaging the buffer tube.
When the action cycles, the bolt carrier is pushed back against the buffer and partially into the buffer tube, with the buffer spring then pushing the buffer and bolt carrier forward, back into battery. The role of the buffer is to slow down the movement of the bolt carrier, cushion its movement back and provide additional mass in its forward movement to firmly chamber a round and close the bolt.

The right buffer can take a top-tier tactical AR to the next level for the LE officer going into harm’s way. Photo courtesy Heavy Buffers
Here is where the weight and design of the buffer comes in and why there are so many variations and designs. Most standard buffers in semi-auto rifles tend to be fairly lightweight. A lighter buffer can be more forgiving and allow the action to cycle more reliably with a wider range of ammunition, especially lighter loads, or if some parts are not entirely up to spec.

Spike’s Tactical buffers use powdered tungsten making for a smooth cycling rifle. Photo courtesy Spike’s Tactical
By Jorge Amselle
BLOG ARCHIVES

