2012年04月20日
TM Scar Gearbox Disassembly
私たちのブログを訪問していただきありがとうございます。あなたがお持ちの場合DIYの要求は私達に電子メールを送信してください。
Following are step by step photos of how to disassemble your Tokyo Marui Scar gearbox. This is the second part, the first part is the takedown which is blogged here:
http://echigoyaworks.militaryblog.jp/e289188.html
The gearbox shown here.

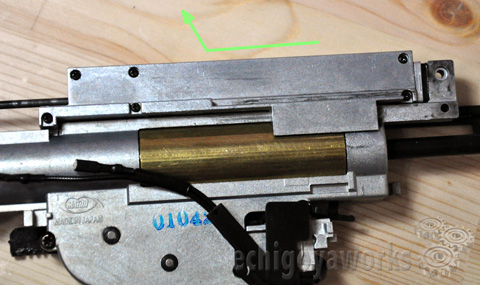
First we need to remove the recoil assembly. First we need to remove these 3 screws to remove the fornt part of the recoil assembly.

After removing, slide recoil guide out and then remove the recoil block on top of the gearbox as shown in the direction.
Now to open the gearbox, remove these 4 screws using a torx driver.

After removing them, there is still one more screw hidden. First pull the wires out and rotate the wire cover as shown.

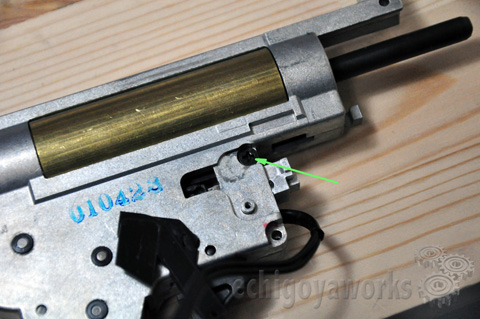
Now you have access to this screw which is holding the bolt-stop assembly, remove it. Make sure to remember how it was installed.

Then this is the last screw that holds the gearbox together.
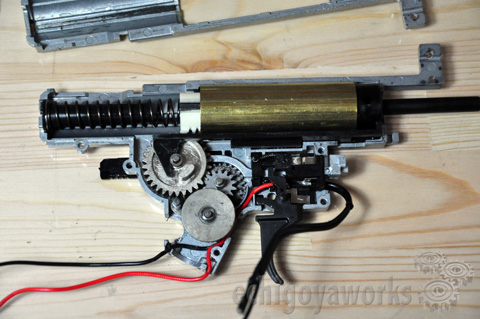
And it is done, gearbox revealed as shown.
Reassembly tips.
This notch on the recoil guide will held by the screw that goes in here.

Reassemble first the left side of the recoil guide to put it back in place before inserting the recoil guide.
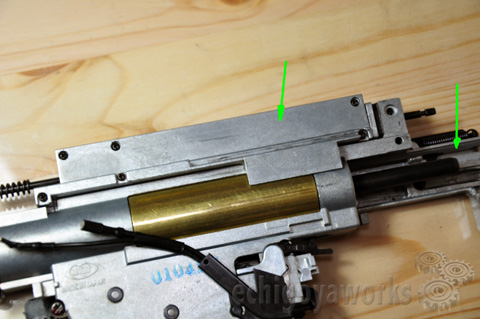
Then insert the two recoil springs and the buffer in the back.

And that's it. If you have questions send me an email.
BLOG ARCHIVES

Following are step by step photos of how to disassemble your Tokyo Marui Scar gearbox. This is the second part, the first part is the takedown which is blogged here:
http://echigoyaworks.militaryblog.jp/e289188.html
The gearbox shown here.

First we need to remove the recoil assembly. First we need to remove these 3 screws to remove the fornt part of the recoil assembly.

After removing, slide recoil guide out and then remove the recoil block on top of the gearbox as shown in the direction.

Now to open the gearbox, remove these 4 screws using a torx driver.

After removing them, there is still one more screw hidden. First pull the wires out and rotate the wire cover as shown.

Now you have access to this screw which is holding the bolt-stop assembly, remove it. Make sure to remember how it was installed.

Then this is the last screw that holds the gearbox together.

And it is done, gearbox revealed as shown.

Reassembly tips.
This notch on the recoil guide will held by the screw that goes in here.

Reassemble first the left side of the recoil guide to put it back in place before inserting the recoil guide.

Then insert the two recoil springs and the buffer in the back.

And that's it. If you have questions send me an email.
BLOG ARCHIVES


Dura Coat Finishes
P90 Disassembly
MP5K Disassembly
H&K UMP Gearbox ver. 3
M4A1 AEG Disassembly
Gearbox Reassembly
P90 Disassembly
MP5K Disassembly
H&K UMP Gearbox ver. 3
M4A1 AEG Disassembly
Gearbox Reassembly
Posted by echigoyaworks
at 12:24
│DIYs

