2012年01月03日
Beretta ARX-160
私たちのブログを訪問していただきありがとうございます。あなたがお持ちの場合DIYの要求は私達に電子メールを送信してください。

The ARX-160 is an assault rifle manufactured by Pietro Beretta S.p.A.. Developed for the Italian armed forces as part of theSoldato Futuro (Future Soldier in English) program, the ARX-160 has been launched in the year 2008 as a commercial weapon system independent from the Soldato Futuro ensemble, complete with a companion single-shot 40mm NATO low-velocity grenade launcher, called GLX-160, which can be underslung to the rifle or used with an ad-hoc stock system as a stand-alone weapon.

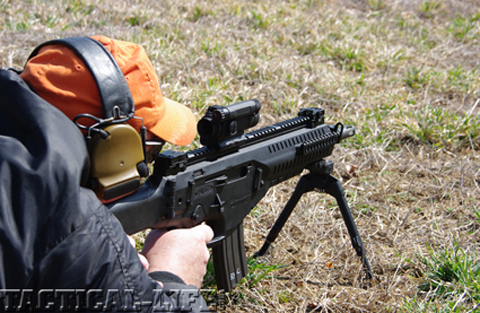
The ARX-160 departs from the previously issued Beretta 70/90 weapon system under several points of view. The weapon is composed of two receivers, both manufactured mostly in polymer, and operates through a short-stroke piston system. Feeding is through STANAG magazines. The weapon's unique features include ambidextrous safeties, magazine catches and charging handle, the ability to change which side spent casings are ejected, a quick-change barrel which can be removed and replaced in seconds without tools, picatinny rails and a foldable telescopic stock. The lightweight barrel is chrome lined and manufactured by the hammer forging process at the Beretta factory in Gardone, Val Trompia, in the Brescia region of northern Italy.
Photos from tactical life.
NEWS ARCHIVES

2012年01月03日
Umarex HK416D GBB from VFC
私たちのブログを訪問していただきありがとうございます。あなたがお持ちの場合DIYの要求は私達に電子メールを送信してください。
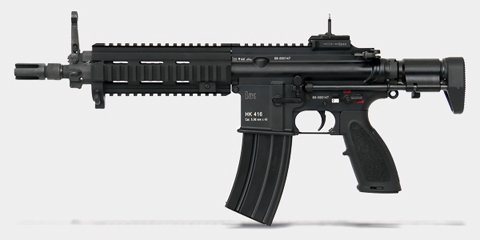
Last month VFC announced the coming HK416D gas blowback rifle with full from Heckler & Koch thru Umarex. Below are the pages of spec and features and that will come with the gun.


Another one to be on the lookout for is the HK416C, CQC version of the 416D.

NEWS ARCHIVES
Last month VFC announced the coming HK416D gas blowback rifle with full from Heckler & Koch thru Umarex. Below are the pages of spec and features and that will come with the gun.


Another one to be on the lookout for is the HK416C, CQC version of the 416D.


NEWS ARCHIVES
2012年01月03日
Handgun Maintenance guide
私たちのブログを訪問していただきありがとうございます。あなたがお持ちの場合DIYの要求は私達に電子メールを送信してください。
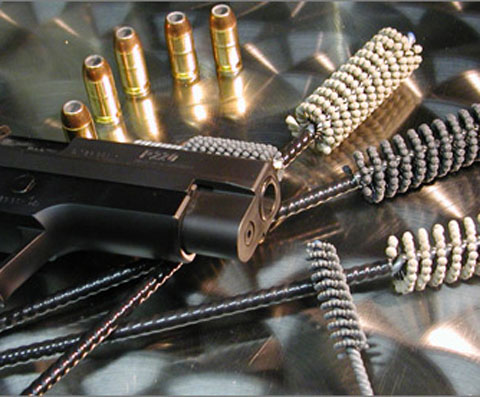
This is a small guide on how to get the best performance out of your handguns now they have been broken out of storage. (This is for airsoft gas guns, as opposed to the photo above.)
To completely overhaul your handguns you are going to need the following tools and materials.
Valve Key. (I use the one made by KSC as it is compatible for all gas magazines and will undo both the inlet valve and the release valve)
Philips and Flat head screwdriver.
Cleaning Rod. (With cleaning swabs)
Cotton Buds.
Other tools used for disassembling the hand gun.
100% pure Silicon oil (Not spray)
Silicon Spray
Cleaning spray (RC Car cleaner by Tamiya is recommended)
Air canister (Duster spray)
Handgun manual
Magazines:
One of the first things to fail on a GBB or NBB handgun is the magazine and these require a lot of maintenance, which is often overlooked by the operator.
The first thing you should do to maintain your magazines is never manually vent them. After a day of skirmishing, many people will press the release valve and vent all the gas from the magazine. This is a big non-no. Venting the gas does several things:
1/. Blows all the factory lubricant out of the magazine
2/. Causes freezing of the O-rings in the vent lips and release valves, which causes accelerated wear, and can also misalign or warp them breaking the seal.
3/. Can cause the inlet o-ring to rise up the shaft which causes the inlet valve to leak or fail all together.
By keeping an amount of gas in the magazine, it keeps the o-rings intact and forces oil into the microscopic gaps between o-ring and valve or magazine wall.
Now the first thing we are going to do is vent all the gas left in the hand gun, the best way to do this is to fire of the remaining gas also know as dry firing, or as we are going to completely overhaul the magazine you can manually vent it.
Once all the gas has been vented, you will use the valve key to undo the release valve and inlet valve. Be careful when inserting the key into the inlet valve as these are very delicate and can easily be deformed by being overly aggressive.
Picture of an inlet valve (upper left) and a release valve (lower right)

Once these are removed, put them to one side. Now we are going to break open the magazine. There are several different magazine designs and it will best to consult the manual to see where the magazine breaks down. The TM Glock range has a base plate while the Sig P226 will break in half. To remove the base plate or separate the two halves there is a Philips head screw located next to where the inlet valve is, once you have unscrewed this you will need to remove the washer and the o-ring.
You will also need to use a pin tap to remove the loading lips from the top of the magazine, be very careful not to hit the lips as any damage to them can render the whole magazine useless.
Be careful because when the base plate or magazine is separated the loading spring and plunger will release.
Now you’ll need to inspect all the o-rings to make sure they are intact, any damage means they will need replacing, damage may consist of nicks on the surface or fuzzing of the o-ring. Fuzzing, is where the o-ring looks like it has fur due to the outer surface becoming frayed.
(A word of advice on replacing o-rings, do not buy Airsoft specific o-rings, these can be bought at any hardware store. Tokyo Hands will also carry these and can be replaced with latex once for better seal.)
Another thing you might notice on the o-rings and the internal parts of the magazine is a white powdery substance, this will be evident in magazines that have been vented a lot of are old and have not been maintained over the years and needs to be cleaned out.
Using the duster, blast the magazine parts removing all the powdery white substance, any that is hard to remove use a lint free cloth with some silicon oil on it slowly rub away the powder or in hard to reach or fiddly areas use the cotton buds.
Now go through and remove all the o-rings from the valves and locking screws, I normally photograph the o-ring with the part so that I have a reference for when I go to reassemble the magazine.
Getting a zip lock bag, pour some of the 100% pure silicon oil into it, just enough to coat all the o-rings. Leave this to one side while you work on the rest of the magazine.
The next thing you will need to do is lubricate the vent valve, put a few drops on to the valve and manually open and close the valve, make sure that you also coat the screw threads as well as this will improve the air seal when you come to reassemble.
Next place a drop or silicon oil on the inlet valves inlet (the place where you fill it with gas) and using some HFC134a gas give the inlet valve a quick blast, just enough to blow the oil through the valve, but not to much as too blast it clear of the inlet valve. (An almost empty can of just propellant is perfect for this job)
Now using the same cloth that you used to wipe away the white powder, give the inside of the magazine a good wipe around. This should give the insides a slight micro coating of 100% silicon oil. Pay particular attention to where either base plate will sit or where the two halves join, as again this will give the magazine a better air seal.
Once this is done, you are now ready to reassemble the parts with the correct o-rings that have been left to soak in the silicon. I recommend that you don’t wipe of the excessive oil just put them on as they are.
Again, once this is done, you are now ready to reassemble the magazine. Make sure that all the o-rings are seated correctly.
You are almost done, the only thing left to do is fill up the magazine with gas. I would recommend HFC134a for this rather than any high power gases such as propane or CO2. Once you have filled the magazine I would recommend that you leave it for about 1 hour in a window. This will allow the magazine to heat up and the gases inside to expand helping to force the oil in to all the crooks and crannies and seating the o-rings perfectly.
Now here is the fun part! Load her up and blast away, remember that the excessive amounts of oil is going to vent out of the magazine coating the bbs, barrel, loading nozzle and pretty much everything else, but as the next part of this tutorial is about maintaining the gun itself wee don’t need to work about the oil.
Repeat this for all the magazines you have for the particular handgun you are maintaining.
I find it takes about five full magazines to get rid of all the extra oil.
The Handgun:
Now although there are many moving parts in your handgun these are actually the easiest out of the two to maintain. You will need to start by separating the slide from the receiver. If you are unsure how to do this consult your manual.
Once you have done this, put the receiver or lower frame to one side as all of the actual gas channelling parts are found in the slide.
Now you will need to disassemble the out and inner barrel from the slide, again if you are unsure how to do this consult your manual.
The first thing we are going to do is clean the inner barrel, I would recommend totally removing the inner barrel from the hop unit as this will prevent you getting any cleaning fluids on the hop rubber. (cleaning fluids is normally 100% alcohol or a chemical that can cause premature damage to the hop rubber)
Once the inner barrel has been removed from the hop chamber you can give it a good coating in cleaner, using the barrel cleaner to remove all the dirt, this might take several cleaning heads until no dirt is visible. Do not spray any lubricant in the barrel as you want this as dry and clear as possible.
Now you can give the hop rubber an inspection, again if there is any visible damage to the hop rubber you will need to replace it. Giving the hop rubber a soak in 100% silicon oil will rejuvenate it and extend the life of the rubber.
Make sure though that you wipe clear the inner surface of oil before installing, especially the area that makes contact with the BB as it passes through the unit. You are now ready to reassemble the hop unit and barrel.
Once this is done, you should now go over the out barrel cleaning any dirt or grit that might have built up over time. I would also recommend wiping down the outer barrel with a piece of cloth and small amount of silicon oil. This will allow the slide and the outer barrel to slide more easily when fired.
Now its time to work on the slide, this is a lot more fiddly than the barrel and you will need to be careful not lose the springs in the loading nozzle. Again consult your manual for directions.
Once you have broken down the slides internals you will need to look at the o-ring on the piston head, again replacing it if its damaged and soaking it in silicon oil, this time though you will need to wipe clear the excessive oil so that it is not blown through the loading nozzle and finally into the barrel.
Next thing you will need to do is give the loading nozzle a good clean as this is also prone to the white powder building up from excessive use. Follow the same instructions that I listed for cleaning the magazine. Once this is clean, you can use a finite amount of oil to lubricate the contact points of the loading nozzle.
One area to take note of is the springs, these might have become crushed or deformed and these are essential to the reliable workings of the handgun. If these need replacing then I would do it immediately.
Once you are happy with the job you can reassemble the internals and move over to the lower receiver/ frame.
The lower receiver/frame is the easiest part to maintain as this houses the trigger assembly and release catches and only requires lubrication. This is also probably the only place you want to use the spray.
Give all the working areas a slight coating of silicon and wipe away any excessive amounts that may build up.
Finally the rails, this is the main point of contact between the two halves and I would suggest giving these a good coat of 100% silicon oil, reassemble the two halves and manually cycle the gun to give a good coating over the whole surface area of the rails and wiping away any excessive oil.
Once this is done you are good to fire off a few rounds, remember that there maybe some oil build up or possibly some vented, so be ready to give the inner barrel a swab again.
Once you are happy with the performance you will want to readjust the hop unit and you are ready to go!
Final note:
For operators of custom handguns using High Flow valves and higher pressure gases I would recommend that after every 8-10 magazines passed through the gun that you place a drop of 100% silicon oil on the inlet valve before filling the magazine with gas. This will maintain the o-rings and slide internals for longer.
I would also recommend that you never manually vent your magazines leaving some gas inside the magazine to maintain a slight pressure. (by Fareast)
NEWS ARCHIVES

